Category Archives: Projects

Last Quilt Top of 2016 – Squares & Diamonds

For a number of reasons, 2016 was a challenging year for me. However I still have many things to be grateful for so I’m not throwing myself any pity parties!

So I did not have a lot of quilting time available, but I did take advantage of a cold wintry weekend to make a top for which I had an idea brewing for quite a while.  This is the result:

quilt-1

This was made with what I call a “double-snowball” technique.  When you “snowball” the corners of a square, you take a small square, line it up in the corner of a larger square right sides together, and attach it by sewing a diagonal line down the middle then trim off the excess and press out.  You end up getting a somewhat round block that is commonly called a “snowball”.  Like the photo below:snoball-example


However I did a variation of this by first sewing a border around my center square, then I attached a smaller square on each corner, trimmed and pressed out, then attached a smaller square to the corners again to make a block that looks like this:

quilt-3

After I made several of these blocks I sewed them together, sewed on borders, and ended up with the quilt top pictured, which had a squares and diamond pattern.

If you would like to make a similar quilt, click on the following link to see a tutorial for my Squares and Diamonds quilt.  You can also click on the Tutorials tab and get to it there as well.

Quick, Easy Gift for Book Lovers

Do you have friends or family members that are avid readers?  Well here is a quick and easy holiday gift you can make them!

bookmark-final-1

This bookmark was made with cloth ribbon, a decorative button, and a cloth-covered pony-tail elastic.  Here’s how I made it. I used ribbon that was 7/8 inches wide and a button that was 1 1/2 inches round:

Take your ribbon and wrap it around the cover of a standard size book.  Lay your button on top of one end of the ribbon so that the bottom of the button is about at the end of the ribbon.

bookmark-3-1

Lay the pony-tail elastic so that the top is about where the button holes are. Trim the other end of the ribbon approximately 1/4 inch from the bottom of the elastic.  I cut the ribbon with pinking shears just to make sure there would be no unraveling.  The goal is to be able to “button” the bottom of the ribbon to the top using the elastic, so you want it to be a little snug at this point. Remember, it’s just wrapped around the book cover to get some basic measurements, not the whole book or a bunch of pages yet.

bookmark-4-1

Then with your ribbon right side up sew your button to the end. On the other end fold the ribbon about 1/2 inch around the elastic and stitch it closed.

There you have it!  A bookmark that won’t fall out or get lost.

bookmark-1

You can also make this with a spare 2 1/2 inch fabric strip from a Jelly Roll, however that’s a little more time-consuming.  You measure and cut the same way, but to have clean edges you need to fold and press them under (on the sides and ends) then sew them down before you add the button and elastic.  However it does give you an opportunity to sew some decorative stitches on it if your machine has them.  Here’s one I made.  I rushed this as I was just trying it out, but would probably be a bit more careful if I was really going to give it as a gift!

bookmark-jr-1

So using a left-over Jelly Roll strip is an option as well!

I hope you have fun experimenting with colors and buttons to make some custom bookmarks for your loved ones!

Friendship Block Quilt – a Reminder of What I Love About Quilting

My daughter and her husband are a military family.  They have lived the last 3 years in Anchorage, Alaska, initially to my daughter’s dismay (she hates cold weather).  But once there she embraced the natural beauty and outdoor adventures available, skiing, ice fishing, hiking, and more (picture a moose walking up to her patio door) and made some really good friends.

They are now being reassigned to a new base and she asked if I would make a going away quilt for one of her best Alaskan friends.  She chose a Friendship Star block and picked a variety of fabrics with prints that reminded her of shared interests and the fun that they had together.  Since she wanted to pick out the fabrics herself and ship them to me, the only direction I gave her was to try to get contrasting colors for each block so the star shapes wouldn’t blend with the background. It was a fun challenge to get the fabric in the mail and put the quilt together.

The end result is pictured below.  I left one square plain white so that she could write a message for her friend in that corner.  Her friend cried and cried when she received it.  A reminder that something made with love will always be a masterpiece!

Photos are from my phone as I forgot to take pictures with my real camera, LOL.

If you would like to learn how to make a Friendship Star block, here is a link to a great tutorial: Friendship Star in 5 Sizes.

friendship-star-quilt-for-anna

friendship-star-quilt-for-anna-back


Happy National Quilting Day! Rising Star Variation Block.

To celebrate National Quilting Day I decided to put my spin on a block pattern I learned from the Missouri Star Quilt Company that they called the Rising Star.  After I made a test block based on their tutorial I decided I wanted to change some things to reduce some of the fabric bulk that occurred using their sewing and cutting techniques; plus make the center of the star different.

So here is my block which equals 6 1/2 inches by 6 1/2 inches square:

Rising Star

Which can be laid out like this to form a big star block that finishes at 12 1/2″ x 12 1/2″:

Rising Star Block

I’m working on designing a quilt with the star block which is still in progress, but here’s two examples of quilts you can make with the 6 1/2″ x 6 1/2″ block:

Using the Star layout:

Quilt Layout Example

Using a zig-zag type of layout:

Rising Star Block Variation

You can click HERE to learn how to make this block or go to my tutorials tab at the top of my site and look for Rising Star Variation.  Have fun!

Fast Scrappy Four Patch Baby Quilt

This little quilt top came together really quickly by using a short-cut for making four patches.  I learned the technique a few years ago and thought I’d share it for those of you who need/want a fairly quick project.

To make the top exactly as pictured you only need one charm pack (pre-cut 5 inch squares) and a little white fabric and solid color fabric.

I actually only used 20 squares of patterned fabric from one Charm Pack (normally there’s 42 squares in each pack) then cut 20 more 5″ squares from different colored solid fabric that I thought would go well with the charm squares.  But you could certainly just use all squares from the charm pack and it would work just as well.  My personal preference was to break up some of the pattern with some solids.

The finished size for the pictured top is 40″ x 35 1/2″.

Click on this LINK to go to a step-by-step tutorial for how I made this quilt top (or click on my Tutorials tab at the top of the page).

Accidental Quilt Block Variation – REDO 2015

I have received some requests to write out a step-by-step tutorial for the variation of the block I made in my posting titled Re-thinking My Accidental Quilt Block from January 19, 2014. Because I just showed various pictures, folks trying to make the block became confused. Then I discovered there was an unintended quirk in the way the quilt was turning out based on some cutting instructions! So I deleted that post and wrote this new variation that works out the way I originally intended!  So if you read the original post and wondered why you couldn’t find it – it’s gone!

I feel this new variation is way easier to make, so I’m posting a tutorial on how to make that one instead. I think everyone will be happy that I did, LOL.

Pictured below is a new sample block and two potential layouts that could be used for a quilt. You may notice the colors changed in the quilt layout samples because I didn’t realize I was low on the fabric I used for the block sample. 🙂  To cut my pieces I used 2 ½” wide strips from a Jelly Roll which resulted in a block that equaled 6 ½” square.Block Pieces-9

Block Pieces-10

Block Pieces-11

Click on this link to get to the tutorial, or just click on my Tutorials link at the top of the page. Look for the Accidental Quilt Block Variation – 2015.

Sorry I’ve Been Absent – But New Pattern to Come!

I have woefully neglected the blog due to several commitments that have kept me away.  One of which included a quilt I’m about to finish as a gift to someone.  However since I over-bought the fabric I needed for the quilt design she chose, an idea for another quilt using the leftover fabric has emerged.  I will be posting that soon so hang in there!


Part 3 – Deconstructing my Friendship Star Quilt – Lessons Learned

I have been sick with a nasty virus folks, so my brain hasn’t been available to add part three of my posting.  But antibiotics finally kicked in and I’m starting to function again, so on to the last posting on the quilting and binding of my Friendship Star quilt.

First, I want to talk about my challenge doing machine applique on the inside curves of a circle cut into the center of a rectangle block.

Now I’m no expert at applique in the first place; only doing it twice before and only on the outer edges of circles.  So wrapping my mind around sewing down the inner edges of a circle cut into a rectangle was a bit challenging for some reason!  You can see the “messy” result below.

Friendship Star 2

Plus, my sewing machine allows me to choose “applique” stitches. The one above may also be known as a “blanket stitch” on other machines.  My machine also allows me to do “mirror images” of stitches, so basically, I could choose the blanket stitch that makes a stitch falling to the left, reverse that and make the stitch fall to the right or vice-verse just by pressing a button.  That makes life pretty simple,  huh?

Machine Setting for Applique

However I think I really just went too fast and lost control of my curves.  I ended up missing some stitches and had to go around a second time.  The stitches ended up looking more like a sunburst, with lines going out in random different angles instead of clean, more exact stitches as you would  normally see on an outside curve.  In the end, I was okay with this and considered it a “design element”, LOL.

However I just had to try it again on another sample after I had finished my quilt, which actually turned out better.  So again, the key is keep your needle as close to the inside edge as possible, go slow, stopping after two or three stitches then lifting your presser foot to readjust the position of your block so you can keep moving around the curve.

Inner Circle Example

The one above turned out better than the one in the quilt itself :).

Machine Binding a Quilt

I am not the best at hand sewing so I have always sewn my bindings on by machine.  There are several good tutorials on how to do that, but I recently came across a new one that I tried and liked the result better than what I had been doing.

Normally, I was sewing the binding to the BACK of my quilt first, then to the front.  This time I sewed it to the FRONT of the quilt first, and liked that even more.  However, you have to feel VERY confident that you can sense, or feel where the folded over edge of the binding is falling in relation to the binding on the front (it has to fall past the stitching on the back) to know you are not accidentally sewing a very wonky seam or sewing into the front of the binding.  It’s kind of scary because you can’t see whats happening on the front, but I found I could actually feel where I was and didn’t mess this up.  Plus, if you are using a color of thread that matches the front of your quilt, it’s probably less scary. Here’s a link to an excellent tutorial on the Cluck Cluck Sew blog, a wonderful blog with great information and inspiration.

I always use 2 1/2″ strips for my binding. Below is a sample of what mine looked like.  Because I already had some straight stitching in the border, this additional line of stitching did not look out of place in my opinion.  So part of making the decision to bind in this manner might depend on what else is going on in your front borders, or the color of your thread and how much it might stand out.

Binding example

So that’s it for deconstructing this quilt to provide a little insight on my thought process behind designing and quilting this project.  I hope it may give you some ideas and tips as well.


Part 2 – Deconstructing My Friendship Star Quilt – Lessons Learned

Part 2 on this topic is to discuss the center section of this quilt and my thought process for the quilting.

Center Section

Quilting Diagonal Lines

Let’s start with the center star block first.  I decided I wanted to straight line quilt on the diagonal to add some interest. I think you can tell how that turned out in the photo below.

Diagonal Example

I laid out my starting line with a piece of painters tape in the center of my block.  But I didn’t assume if I put the tape there it would line up well with the diagonal slant of the star points.

Diagonal Tape

So I took a long ruler and lined it up with the diagonal lines of the star points to see if the tape edge lined up correctly as well. I didn’t want the stitch line to be at a weird angle compared to the angle of the star points.  I would notice it even if others did not, LOL.

Horizontal stitching ruler

In this case the tape line actually was a tad off so I slide the ruler down so that the edge was close to the center but a line was still lined up with a star point angle, and adjusted the tape along the edge of the ruler.  That made me happy.

Lesson Learned:  I could have just done that first rather than checking to see if the tape lined up after I placed it, (palm bump to forehead).

Once I had my tape adjusted I lined up the edge of the foot and started sewing.  This meant that I did not have a stitch line that ran smack down the center of the block, since my stitch line wouldn’t have lined up exactly from corner to corner anyway.  I thought it looked fine IMO.

Once that base line was sewn I lined up the edge of my foot with it and sewed the next line of stitching, and continued on lining up my foot with each subsequent stitch line.  I sewed one half of the block first, then sewed the other half, moving away from the center, again so that I could make sure I was smoothing the fabric equally in both directions as needed.

Diagonal Tape 2

Echo Quilting Around Circles

After the center block was done it was time to do the two flanking blocks.  I decided to sew vertical lines in those blocks but to “echo” the outside edges of the circles.

Friend Star 4 curve

To accomplish that I again went to my long ruler and laid it over the circles.  I followed the half-inch marks from the approximate center of one circle to the approximate center of the other circle to be sure the distance between the lines worked out okay.  I then marked where I was going to start and end my vertical stitching lines with that trusty painters tape again.

Circle 1

I then chose what I considered the starter line then added longer pieces of the tape to the little one to run the tape from top to bottom of the block.  I left the other piece of tape in place as well so that I knew where I wanted to stop.

Circle 2

I sewed all of the center vertical lines first, running them through one half of each circle.  Then for the second half of the circles I stopped my foot with the needle 1/2″ from the edge of the circle.

Circle 3

I’m fortunate enough that my foot has two marks on it; one that is 1/4″ away from the needle and another that is 1/2″ away from the needle.  So I can tell where I need to stop.  If you don’t have a mark on your foot you can mark it yourself with a Sharpie (if you want it to be permanent) or a piece of tape.

Also note – since this is a curved edge both marked lines on your foot will not touch the edge at the same time!  The first line to touch the edge is when you stop.  In the photo above that would be the line on the left edge of the foot.

Foot Edge

After I stopped at the edge, with my needle down I pivoted to place the edge of my foot on the edge of the circle, then slowly sewed following along the edge.  When I come to the previously sewn vertical line I stopped 1/2″ away so I can again pivot and line up my foot edge to follow the sewn vertical line to the bottom of the block.

Circle 4

Just keep following your curved lines this same way until you have to stop to avoid crossing over into another block. When you approach the border, or edge of your block you can simply stop your sewing line, cut your threads, then start back up at the bottom half of the curve or stitch in the ditch along the straight seam then pick up the curves again at the bottom.

Friend Star 4 curve

If your last stitched vertical line is a little more or a little less than 1/2″ from the side or border of your block, I don’t feel it really matters.  Just stop stitching when you think it looks good!  In some cases I think mine ended up being just a tad thinner than 1/2″ but I preferred that more than a larger gap between the last line and the side seam/border.  Personal preference rules here.

I hope sharing this process helps you to decide if you want to tackle echoing a curve within a quilt.

My next posting will talk about how I did the machine appliqué  on the inside curves of a cut-out circle, and machine binding.


Deconstructing my Friendship Star Quilt – Lessons Learned Part 1 of 3

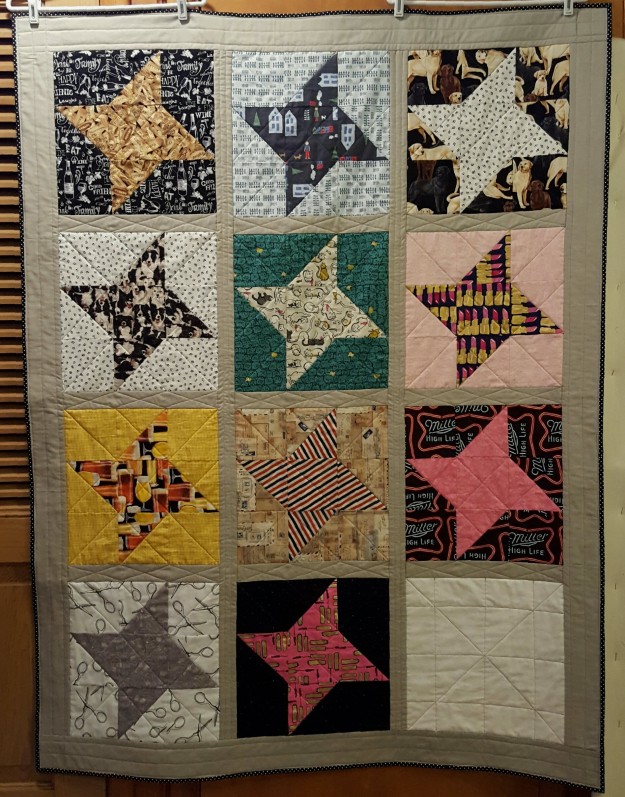
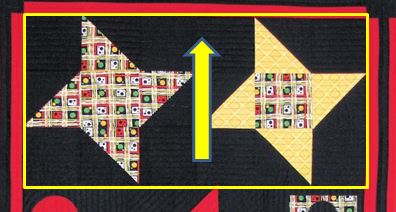
Lately I’ve been working on too many projects at the same time and made the commitment to get ONE completely done!  So here it is; my Friendship Star quilt.

Friendship Star1

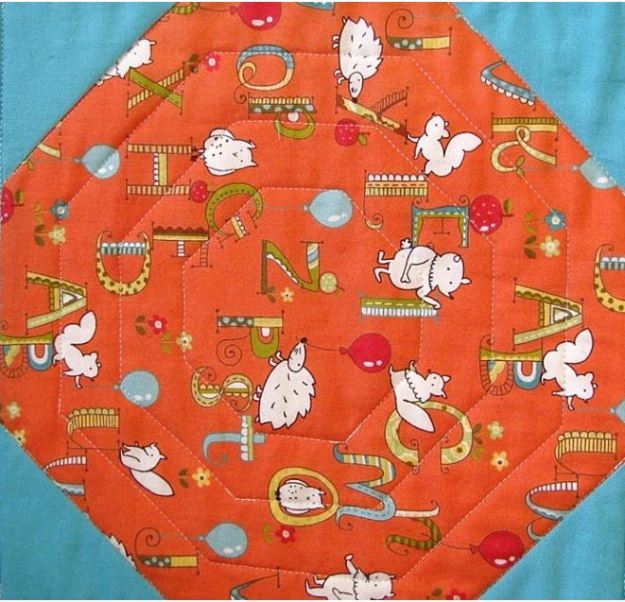
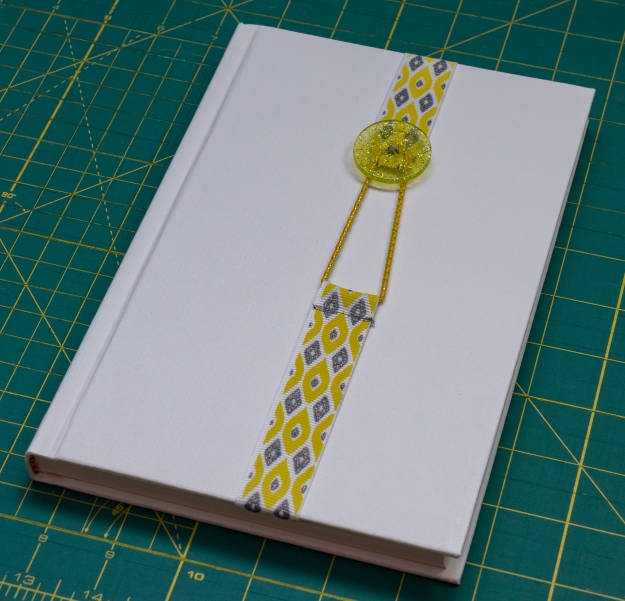
The print fabrics in this quilt were purchased about three years ago during a guild fundraiser that was held at a sewing machine store I was visiting.  Members were selling off fat-quarters and other small cuts from their stash.  I really liked this multicolored print so bought the small amount they had, plus the complementary yellow print.  After moving them around several times on my shelves while looking for other things, I decided to dive in and use them for something.  The “something” is a Friendship Star quilt that finished at 37″ x 47 1/2″.

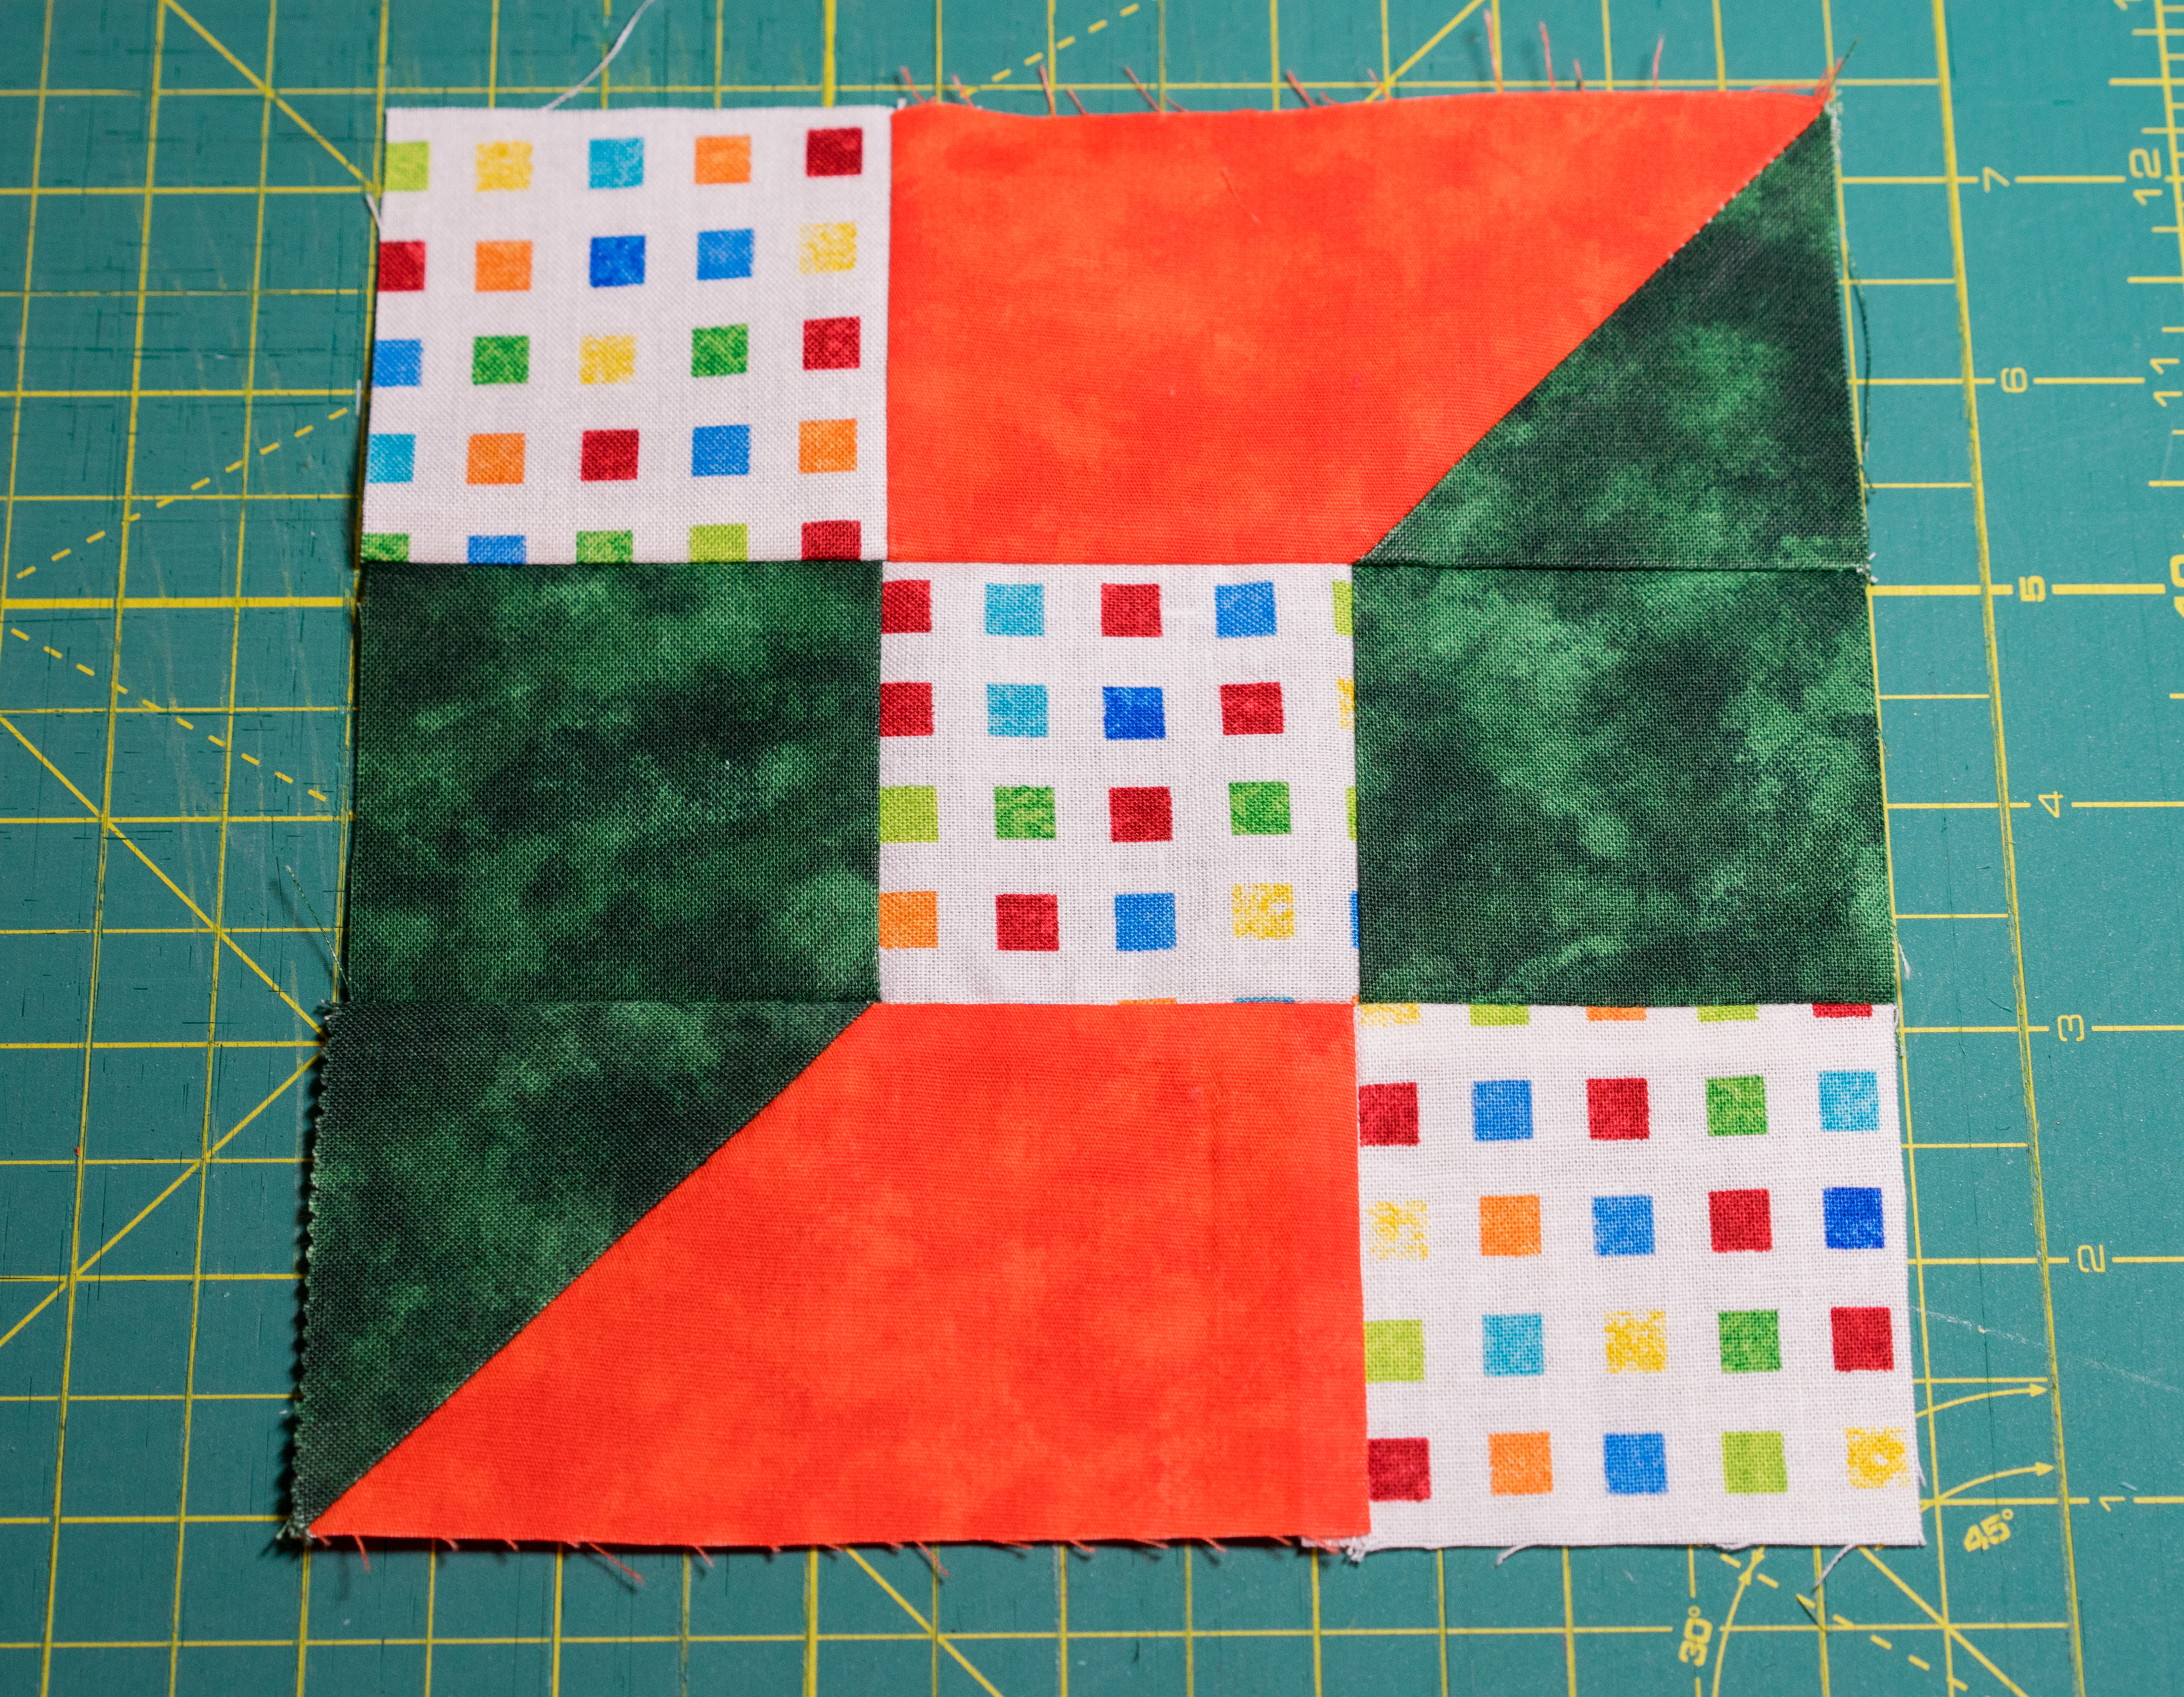
Here is a link to a good tutorial by the Crafty Gemini on how to make a Friendship Star block for those who have not yet tried one: Friendship Star

I also decided to try some new techniques so I incorporated the following:

1.  Dense, straight-line quilting (1/2 inch apart)

2.  Echoing curves around the circles

3.  Doing machine applique on the inside curves of a circle cut into a rectangle

4. Machine binding using a different technique than I normally use

Lessons Learned # 1 – Straight Line Quilting

Patience, patience, patience.  That’s what it takes to do straight line quilting :).  To plan the quilting I decided to tackle it by sections.  The top and bottom sections of the quilt are straight horizontal lines quilted 1/2″ apart.

Horizontal Example

The middle of the quilt is made up of three blocks; the center star flanked by squares on which I appliqued circles and a rectangle with the center cut out.

The center star block was quilted with diagonal lines 1/2″ apart.

Diagonal Example

The two blocks with applique consist of 1/2″ apart vertical lines, but on one side of each circle I opted to “echo” the curved edges.

Friend Star 4 curve

Echo Example 2

No Marking Straight Line Quilting – Here’s How I Did It

Step 1 – I measured the size of the area I wanted to quilt with the horizontal lines.  From the top to the bottom of the first section, it equaled 14.5″.  So it was easy to tell I could sew lines of stitching 1/2″ apart and it would fill the space just fine.

Top Horz Quilting

Step 2 – My sewing machine lets me adjust the needle position.  So my plan was to use the side of my foot as my guide, adjusting the needle position so that there would be 1/2″ from the side to the needle.  As fate had it, I didn’t need to adjust the position at all.  In the center position it measured 1/2″ from the side of my foot.

Horz Quilt Up

So I lined up the side of my foot along the bottom seam of my section and started stitching the bottom row first and worked towards the top, lining up the side of my foot with each line of stitching as I moved up the quilt.  My thought was that I could continue to smooth out the surface of the quilt as needed by working from bottom to top.  No matter how well you pin, once you start quilting the fabric will always shift somewhat.

Wrinkles

I followed this same process on the bottom section after I finished quilting the middle blocks.

Battling Curved Line Endings

As careful as I was trying to keep my lines straight, I suddenly noticed I was curving my lines at the beginning of some of the rows!  I think what happened is that as I tried to set my needle at the right starting point for my line, I shifted the quilt a little at one point, then continued to follow that “off” line for a few more rows until I noticed my error!

So to correct that going forward, I took a small piece of painters tape and lined it up with the edge of a straight row so that I could place the edge of my foot against it and know I was starting off correctly.

Curved Lines

IMPORTANT TIP:  Look at each line after you’ve sewn it to be sure if something got “off” you can correct it for your next row.

I never felt any wobble I made was bad enough to rip out.  It keeps things real…right?

So that’s how I approached my horizontal straight-line quilting.  Part 2 will discuss the diagonal quilting and circle echo technique I used plus the adventure of doing machine applique on inside curves of a circle.

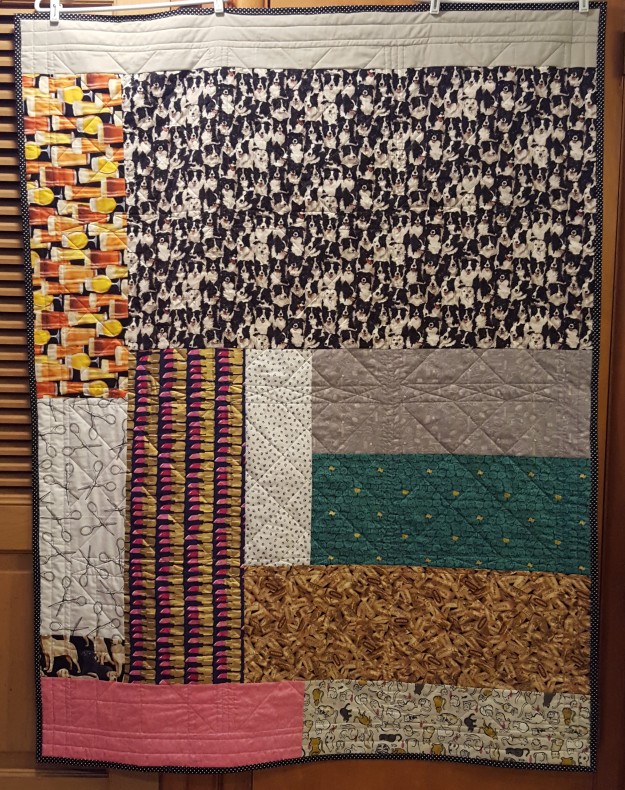
Part 3 is on the machine binding technique I used.