I realized I did not sew and show the block the way I originally intended when I wrote this tutorial! So I updated it with some new pictures and text.
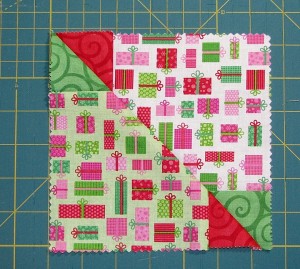
A couple of years ago I became fascinated with the Disappearing Nine Patch quilt block and decided to experiment with it. I loved how you could take one block, sub-cut it, and sew it back up to make a different block. So I took that concept and went a little farther resulting in this block OR this block (depending on how you sew sub-cut triangles together):

Here’s how I made it:
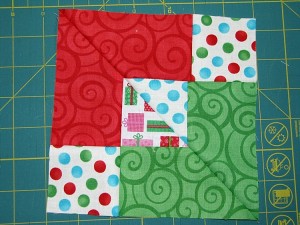
I started with a Charm Pack (pre-cut 5 1/2 inch squares) and made a nine patch block. To end up with the green and red partial “frames” around the block, it’s important that you lay your colors out as pictured here.

I then cut this block in half vertically down the center, then horizontally across the center.

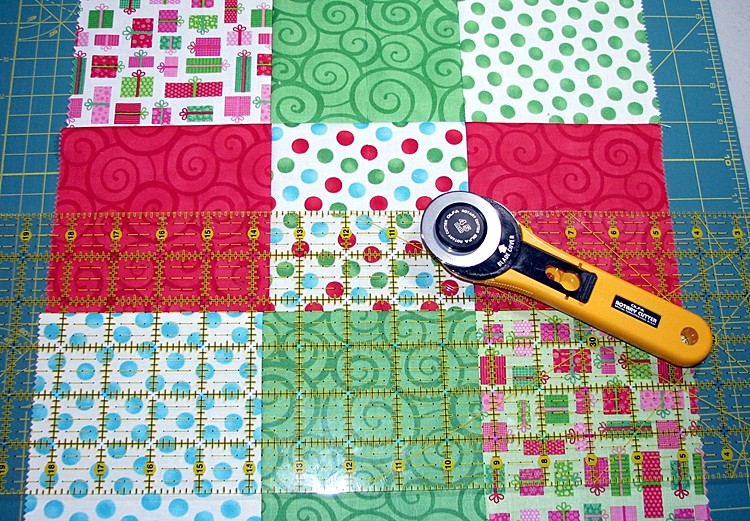
To find your centers line up your ruler with the 2 1/4 inch mark running along the left seam vertically, make your cut, then without moving the block, switch your ruler to horizontal with the 2 1/4 inch mark running along the horizontal seam (as pictured above) and make that cut. You now have four squares.

Time to sub-cut those squares one more time. Each square should be cut diagonally as follows to achieve the same result I got:
The bottom left square should be cut from the right lower corner up to the left top corner as pictured below.

The bottom right square should be cut diagonally from the left bottom corner up to the right top corner as pictured below.

The top left square should be cut diagonally from the left bottom corner to the right top corner as pictured below.

The right top square should be cut diagonally from the right bottom corner to the left top corner as pictured below.

You end up with a diamond-shaped cutting pattern as below.

Using the four center triangles, take one top and one bottom triangle put them right sides together and sew a 1/4 inch seam along the diagonal edge to form a square. Take the other two triangles and sew them together as well. You now have two “accidental” blocks.
Depending on the block you desire, you can sew the triangles together in two different ways.
Block One is my favorite, as I do not know how you can achieve this look in an easier way:
Block Two can be constructed using just squares and triangles, but is also another result you can get:

The blocks measure about 6 1/2 inch square. There will be a couple of dog ears you should trim off before sewing your blocks together.
I have taken images of these blocks and tried out the two following layouts as example quilt patterns that could result from the blocks. The “cross” one is kind of wonky due to the images not fitting together really well, but I think you get the point.
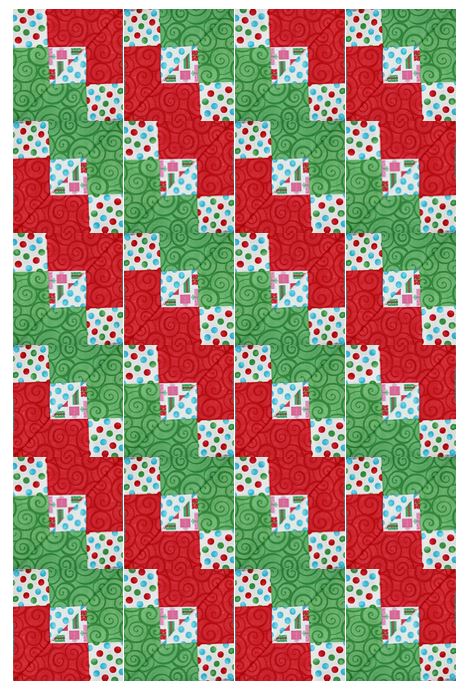
Here is an example using Block One:

Here is an example using Block Two:
The four outer triangles can also be sewn together to make squares that look like this:

Examples of a couple of quilt layouts using only these blocks are below (again, these are just block images pasted together so not perfect):


I haven’t tried combining all four examples of blocks together, but I think this shows there are several options for making quilts from blocks cut from this technique. A little more thought into the fabric chosen rather than what I just threw together might result in some really interesting quilts!
If anyone makes quilts from this technique I’d love to see them.

Love what you did, I usually do scrappy but want to try this
awesome!
I didn’t see where it had the finished size. Does anyone have the finished dimensions?
She mentioned the blocks would be about 6.5″ square, so I would say 6″ finished. You could do 6 blocks horizontally by 7 blocks vertically to make a 36″x42″ top and add a nice 4.5″ border all around to end up with 40″x46″ baby or lap quilt. You can play with sizes or even add sashing for a different look and expanded size as well.
Thanks!, great pix. Will try this.
Hola, me encantó tu trabajo, da varias posibilidades para trabajar.
Felicitaciones y gracias por compartir.
Bendiciones 🙏
I FINALLY FOUND THIS! THANK YOU SO MUCH!!
I saw this in a group of 15 disappearing blocks but the link to the site for the pattern was broken. I have a friend trying to help me with the breakdown but no luck figuring it out. Finally today I did a Google image search and followed through pinterest to get here. I knew 9 patch bc of the number of fabrics, and I figured diagonal cuts but my brain quit there. Accidents can be anonymous blessings!
I like the possibilities of this block a lot. Going to try the different arrangements.
Hola.excelente explicación. Además de un solo bloques podemos hacer varias combinaciones..Gracias por darnos a conocer está técnica. Por favor estoy interesa en todas sus publicaciones. Mi correo es adelacgamez@gmail.com por cualquier otra información relacionada con el tema
was all the designs created from just cutting the squares in 2 1/4 in squares or cutying them into triangles
I believe she said she started with charm squares, which are 5″ square. Sew 9 together, then cut in half horizontally and vertically, then again diagonally in both directions.
Hello, I love this quilt! Block 1, your favorite, how big is it? Trying to figure out just how many 5 1/2 inch squares I would need to make a king size quilt. This is going to be my very first attempt at making a quilt. I have watched many videos and read many arrivals so far. This looks pretty easy. Just gotta take my time with the cuts and making sure the fabric patterns get put together correctly and with this way of doing it I will get 2 quilts out of it.
Hello, I love this quilt! Block 1, your favorite, how big is it? Trying to figure out just how many 5 1/2 inch squares I would need to make a king size quilt. This is going to be my very first attempt at making a quilt. I have watched many videos and read many arrivals so far. This looks pretty easy. Just gotta take my time with the cuts and making sure the fabric patterns get put together correctly and with this way of doing it I will get 2 quilts out of it.
The blocks end up about 6 1/2 inches square. I also believe I misspoke about the initial square sizes. I used charm packs, so the squares were 5 inches to begin with.
I made this in a rainbow of colors (my second quilt). I love how it came out, but can’t figure out how to send you pictures.
The most recent post I found is a couple of years old…one of my closest friends has ALS, so I have some understanding of what you have gone through. I hope I hear back from you.
Has anyone figured out how to make this work out? I’ve tried and tried and can’t make this work as pictured. I’m guessing that when you make the 9 block square and cut it as directed, that only have of those triangles made go into the Cross quilt and the other half go into one of the other quilts? And like Emalee stated in an earlier question, my colors match up in the same way that hers does. The cross quilt is beautiful but I don’t want to make two different quilts to use the blocks. Can the designer of this quilt please comment on how she did this?
I can reply to your query about this becoming two quilts. The way the pattern is created, you do end up w/ half of your work being put aside for future use! I was able to incorporate some of the leftovers into my binding and a “stripe” down the back (where the backing seam is). I intend to make some pillows or pillowcases from some of my leftovers (or maybe the 2nd quilt😬). I’m trying to post photos of my finished product.
Really beautiful n very creative. Awesome I love it
Superb … I loved this
Charm packs are 5″ square, not 5 1/2 inches. Will make a difference when sewing things together.
In reference to the “accidental quilt block” pattern: I finally figured out that this is a (3) different quilt pattern. Each quilt comes from the original 9 block pattern. Each quilt is a small quilt. Hope this helps others who are trying to figure this one out. Have a blessed day!
I have been trying for a few days now to duplicate the ‘Accidental Quilt Block’ with no success. I have done everything as shown in the above pictures, however when it comes to putting everything together the blocks made do not give me the design as pictured above. Please let me know if i can email you a copy of my pictures and see if you can detect what i am doing wrong. Thanks for your help. Look the design, hope i can make one like it.
Have a blessed day!
Debbie
This is exactly what I was thinking of for my son’s “off to college” quilt. How big is the BLOCK ONE you showed. Am I understanding correctly in that Block One is only the inner triangles? I don’t have alot of quilting experience, but want to make sure his is about twin size.
Question for anybody: how many blocks (of the original block before cutting into D9P –disappearing 9 patch ) do you need to make let’s say a baby quilt? Reason I ask is because if I use a charm pack, most will have different patterns and to make this D9P you will need many of the same patterns of squares to make D9P.
I’m laughing at my own question! Please disregard, everybody.
I am confused on how the directions say to cut the 9-patch block. You start be using 5.5 inch squares to make the 9-patch block. Therefore, the center square of the 9-patch should be a 5 inch finished square. If you want to cut the block in half vertically and horizontally, it seems to me that you would need to cut 2.5 inches from the seams stated in the directions instead of 2.25 inches.
Question on disappearing 9 quilt using using block 1. I’m having problems getting the colors to match up with block 1. Can you explain how to get the part that looks like a cross to look like that. When I put mine together instead of having red and green alternating, mine has two sides alternate green and red the other two are either solid green or solid red. I have no idea what I’m doing wrong. Any assistance would be greatly appreciated.
I love the way you are experimenting with the D9P. (Disappearing 9 Patch). I saw that abbreviation somewhere and loved it. I too am making a D9P quilt (2 twins actually) and it is going very fast. I think I’ll use your extra sub-cut for a couple of pillow shams! You’ve done a great job showing us how the triangles can be manipulated, Thanks for the inspiration!
Looking forward to giving this a go
I love this, this will be my second quilt, my first one was just blocks sewn together, I’, excited about how you can get different looks.
Thank you for sharing, love all the looks. I plan on making lots of quilts with this cutting technique.
I’m excited to give this a try. I’m going on vacation and will be looking for fabric specifically for this quilt. Thank you.
Pingback: Secondary Patterns | heARTS Creations
Hi,I check your blogs named “Accidental Quilt Block Tutorial- Updated | Beyond Sock Monkeys ~ My Quilting Adventures” daily.Your humoristic style is witty, keep doing what you’re doing! And you can look our website about proxy server list.
Thank you! So creative and very clearly explained. Can’t wait to try these ideas!
Beautiful I’ll have to give this a try!!
Thanks
no pattern
The post is the pattern. The mistake is that charm packs are 5″ square NOT 5 1/2″.